| Post Effects/ Post Image Effects |
Post Image EffectsIntroductionThe Realsoft 3D rendering engine includes an open and powerful post processing system. Effects such as glow, lens flares and dust can be added to the images using the included post effect modules. The powerful features of the post processing engine include:
Most post effects are quick and memory efficient to render. Note that they cannot fully interact with ray tracing, because they are rendered after the raytracing pass. Post processing is an optional step in the rendering pipeline. If post processing is not activated, the rendering engine renders the images directly to the actual output device, such as a file (BMP, TGA, AVI, etc.) or to a view window. When post processing is activated, the image data is copied to a Post Image. There can be any number of Post Effects associated with the post image; each will add its contribution to the result. When all the effects have been applied to the post image, its contents are copied to the actual output device(s). Managing post effectsPost effects can be divided into two groups: effects which are used for rendering particles ('Particle effects') and effects which are applied to the entire image ('Image effects'). Image effects can be created and managed through the select window's Post Image Effects tab.
This tab includes two kinds of objects:
Post images provide the necessary image buffers for post processing. All post image objects can be recognized from the 'monitor' icon.
Post effects are the actual workhorses. Any number of them can be attached to a single post image using the property window. The most common post effects are rendered automatically. Namely, the default user interface is configured so that the file rendering window and the view windows use a post processing configuration defined by the post image called 'Default Effects'. This configuration renders all particle effects, glow and depth of field. You can select another configuration from the file rendering window or from the view property window. This is the basic theory you need to know in order to use post processing in Realsoft 3D. Let's go through one example demonstrating how to add post effects to your images in practice.
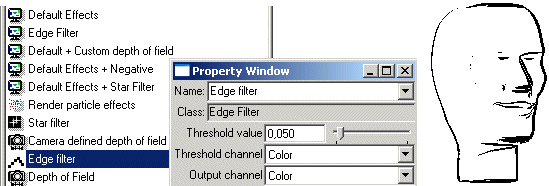
Rendering post effects to a view windowWe will experiment using a simple post effect called 'Edge filter'. It examines sudden color changes in the image to detect edges of objects, and changes a shaded image to an outline drawing. Tutorial level: Beginner 1. Model a scene, or load a provided example 'models/nurbs/simple head'. Render the view; you get the usual shaded result. 2. Select the Post Image Effects tab from the Select window. Drag and drop the 'Edge Filtering' post image to the view window. Note: Drop the 'monitor' like object. There is another 'Edge filter' object appearing lower in the list, but the Image effect is the actual 'workhorse' effect, not the post image. Remember that you always need one post image to set up post processing.
Selecting post effects for a view using drag & drop 3. Render the view. The edge filter changes the shaded image to an outline image.
Edge filtered rendering 4. The amount of detected edges depends on illumination, objects and effect settings. We can try to extract more edges. Double click the actual 'Edge filter' effect (the lower one) on the select window to open the property window. Reduce the 'Threshold' value to, say, 0.05, and render again.
Adjusting the edge threshold value Every time you re-render the scene, the rendering engine also ray traces the shaded image. If the scene is complex, this can make experimenting with post effects slow, because ray tracing usually takes much more time than the actual post processing. Fortunately there is a faster way: 5. We will continue experimenting with the edge filter: adjust a new 'Threshold' value from the property window. Now, select 'Ray trace+Backup' from view window's popup to render the image. 6. Now you have a new test image on the view and the rendering backed up. Adjust the threshold value once more. Then, instead of selecting full render, select 'Render/Post Process' from the view popup. Only the post effects are rendered this time, and the result appears much quicker.
Rendering post effects only
Configuring post effectsIn this example, we will set up a post effect configuration, which applies a star filter effect. The brightest areas of images will get shiny star-like highlights. Such an effect is already available in the default configuration and you can activate it the same way as 'Edge filtering' in the previous tutorial. Anyway, we will start from scratch to get familiar with the post processing tools. Tutorial level: Beginner 1. Go to the Post Image Effects tab in the Select window and create an 'Image Flare' object. (Right click and select 'Image Flare' as shown below)
2. Double click the created Image Flare object in the select window. This opens the property window allowing you to define image flare specific options. Set the 'Brightness trigger' value to 2.5. The trigger value is the sum red+green+blue. For example, brightness of pure white 1+1+1 = 3 exceeds the trigger value. e.g. Any value that is within the trigger threshold receives an image flare. A value of 3 limits the image flare to only pure white pixels. 2.5 allows any reasonably bright pixel to fall within the threshold.
3. Leave the property window open and create a 'Post Image' from the select window's popup menu.
4. Using the property window, rename the created post image to say 'My star filter image'. 5. The property window shows you two lists. The upper one includes you all effects available (including the 'Image Flare' object you created above). The lower 'Active Effects' list shows you the effects applied to the post image. Drag & drop the 'Image Flare' object from the upper list into the lower list.
Note: you can remove inserted effects by selecting the 'Remove' from the pop-up menu of the 'Active Effects' list. (Right click on the effect to be removed.) 6. Switch the select window to show the Rendering Settings tab. Select the settings, which the view window is using (or drag & drop 'Reasonable quality' to the view). Double click the 'Reasonable quality' setting to bring up the properties window. Switch to the 'Distrib' tab and disable the 'Box rendering' option. Image flare has an exceptional property: it works better when box rendering is disabled. The reason is that 'Image flare' analyzes continuous bright areas and adds the flare to the brightest position of each area. Render boxes may break these continuous bright areas. 7. Close the property window. Model a couple of objects and add a light source or two to the scene, so that the 'Brightness Trigger' limit will be exceeded. 8. We have not yet assigned the new post processing configuration to any rendering engine. In the previous example, we did it by dropping the post image to a view window. This time we will use the view property window. Open it from the 'View properties..' popup menu. Go to the 'Render' tab and select 'My star image filter' from the 'Effect/Box' gadget in the 'Rendering Options' frame. Close the view property window and render to see the result.
Post processing configuration for file renderingTo activate a post processing configuration for file rendering, select a desired post image from the 'Effect/Box' list. The post image will then be applied to each rendered image box. You can also define a post processing configuration that is applied to complete images, animation fields and animation frames. Note: all selected effects are applied regardless of animation settings. For example, 'Effect/Field' is processed even if field rendering is switched off. If you don't want post effects to be rendered, clear these fields.
|


 |
 |